I put furniture into and out of this house forever, because I couldn’t decide how to decorate it. Finally I did a deep dive into my boxes of 1/4″ scale “junk” and pulled together kits and furniture I’d previously purchased (like the pretty wicker bed). I also added bits leftover from other kits and my fabric stash. Scroll for more photos.
I purchased the beautiful sofa, chair, and side table from Samantha Creations (her Etsy shop), especially for this house. I thought the colors went well with the theme (and they’re so well made). She has a lot of nice stuff. Tiny lamp is made by me from my large bead stash.
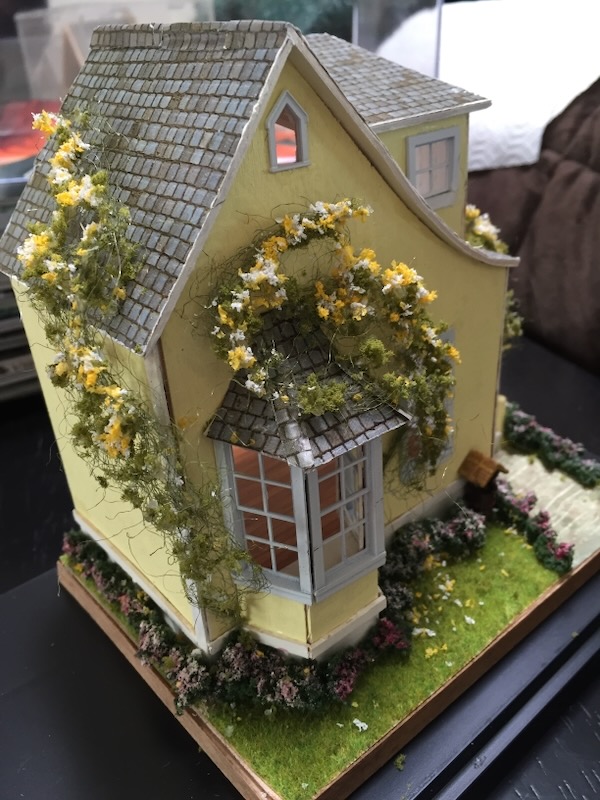
Cozy window seat for reading in the sunshine. (I couldn’t get good photos of this house, try as I might).
I made the lamp on this night table as well. The adorable dressed wicker bed I bought at a Chicago show (I can’t remember from who now).
I decided this house belongs to an older couple who enjoy relaxing, cooking, and puttering in the garden. One of them loves to knit, hence the box of yarn near the chair upstairs.
Finally I have had time to both finish the 2023 June Clinkscales class project and post it to this blog. I actually finished the bed in October, but I’ve been too busy until now to post.
Starting at the beginning:
We were supplied the cast headboard / footboard and canopy pieces, the metal pieces for the canopy support, all the fabric (option to use our own, of course), the MDF for the mattress base, gold leaf, and various foams and trims.
The above photo is after I gold-leafed and glued the basic bed together. Gold-leafing in a dry, dry, dry climate is fun (June in Arizona). Forget letting the size dry for half an hour. Brush on the size and immediately slam the gold leaf on it, or you have no chance of it sticking. At least it seems that way!
If you look on the metal squaring jig center right, you’ll see small gold balls. Those are for the tassels, and we gold leafed those tiny things as well.
We also had cane inserts for the ends of the bed. Two in each slot to give it some depth.
We learned how to make the padded and upholstered end medallions. Here are my pieces completely finished.
I did not take photos of the draping process (or if I did, I can’t find them). There is an outer drape and a lining, and we used a pretty pleat for the main folds. And also glue (the ultimate glue and fabri-tac). So much glue.
The swags (hanging from the canopy) are pieces of fabric folded tightly accordion style and then folded in half.
You can see the gold balls from the gold leafing stage. They hold the tassels on the ends of the bolsters and are also hanging from the canopy.
My pleats aren’t perfect in the back, but I thought you’d want to see what it looks like back there. We added a padded canopy top.
I’d sleep here!
Lit du creneau, BTW, means something like: “The niche bed” or “Bed for a niche.”
I’ve signed up for two more of June’s classes, because I can’t get enough. She’s also teaching one in Chicago this April (https://www.bishopshow.com/ws23) A little pricy but it looks gorgeous! (I sadly will not be in Chicago this year. Too much work to do. Hope to get there again soon.)
I am working on many more minis–will post more soon!
In my last post I mentioned that doing the online class with June Clinkscales in March gave me the confidence to finish another room box I’d started in a class (again with June) in Chicago last year.
This is called La Chambre Bleu, and was modeled after a tile-covered room in a palace in the Netherlands (I can’t remember which one or where, of course).
June did most of the artwork (so we didn’t have to), but we did a lot of decoupage. Lots of gilding, aging, and just fitting everything together. Also lighting.
We did hidden lighting that illuminates the stairs behind the door. We wired it up to a remote control that lets you dim or brighten the light, which is very cool.
I’d only reached this stage by the end of class in Chicago, though she did teach us everything before we left. I just ran out of time. So the scene sat on my shelf, unfinished for a year, until I decided to get busy and finish it.
I added the stairs, finished wiring up the hidden lights, put the door on, and made the bed and the curtain.
I’m very pleased with how it turned out.
Another reason I like this room–there’s chickens! (Above the bed)
I’m scheduled to take another class with June–in June! I’ll post those pics too.
Currently I’m working on a lot of quarter-inch stuff as well as settling into our mountain house for the summer. I left so many of my tools and supplies at our other house, and I don’t realize it until I need something. 🙂 Hopefully I can get stocked enough here that I don’t have to drag boxes back and forth. But I always forget that vital thing …
Sorry so quiet here. I have been doing much since my last post, in all areas of life.
In March, I had the good fortune to take an online class with the brilliant June Clinkscales. This is the result:
June provided the cast panelling and the box facade. We built the box (simple plywood structure), added the spacers, made the floor, painted and aged the paneling, electrified the whole thing with an LED, and did the drapes and upholstered the bench / daybed.
It was fun to watch the bed go from a simple block of wood (a remnant) to a fancy place to sit. June provided the silk for the bed and drapes–I added the lace, because to be honest the seam between my cushion and the skirt didn’t look very good. I found some lace in my stash and added it as well as some trim. I like how it turned out.
June also made the resin sconces, and we painted them plus added the candles.
The box on the floor I bought at the Chicago show last year (didn’t go this year).
I love the drapes and the valence. I hope I can remember how I made them so I can do drapes in some of my houses.
Lots of gluing in this project! And mod podge and paint, and dirtying it all up.
Doing this box gave me the confidence to finish the box I started in June’s class last year. Below is the partly finished project as it was when I left the class. I’ll show the finished version in another post (it’s really neat!)
I usually do a Christmas post, but got bogged down this year. Also didn’t do a real Christmas project this year–worked on finishing an older one. This is a tree scene I put together years ago, from odds and ends that had made its way into my closet over time.
Looking onward to 2023, I have already signed up for a virtual mini class, and I look forward to what mini-ing the year will bring!
I finished up my Halloween House for this year! This quarter-inch project started as a bare-bones kit from Jill Castoral. She adds suggestions for finishing, some of which I did and some of which I went my own way on. Learned a lot about aging and creating siding and shingles from card stock. (See previous post for more about that, and scroll down for more about the landscaping.)
I added LEDs to the inside for some spooky lighting. Two in the fireplace and one in the fat candle by the books. Wires go out the back to a battery.
For the landscape: I used a round wooden base from Michaels, and then built up the hill from layers of styrofoam, which I painted black. I added soil and green clumpy stuff from Woodland Scenics. I also got the tree form from them (it’s a flat plastic thing but I painted and bent it into the shape I wanted.)
I really enjoy Halloween scenes. They’re so much fun.
I bought this 1/4″ scale kit from Jill Castoral at the Chicago show. She has a line of kits where you buy the shell (three walls, roof, floor, windows and door, fireplace and chimney), and then you kit bash it into whatever you want. She has instructions for turning the kit into anything (Halloween, Christmas, Spring, Elf, antique store), and you can go crazy on your own.
I like these because while I have the main pieces cut out for me, then I can do anything, using scraps I have lying around.
I am in my summer house, and my scrap stash is in my winter house, so I had to seriously improvise, but it made me more creative.
This is the basic structure put together, the chimney painted dark gray and aged with light gray, black, and dark green paint.
Siding is cut from card stock. Looks terrible here.
Painted the siding gray.
Also painted the interior dark gray.
The siding aged with washes of light grays.
One thing I did on the siding–I wasn’t satisfied with the way the paint blended the boards together, so I took a pencil (a thin-lead mechanical pencil, which I keep on my work table to make notes and mark stuff), and shaded the edges of each board, smearing with my finger as I went along. I like how it turned out.
The interior aged. The fireplace is included–I sanded it and dented it a little.
Fireplace finished and painted. The branch growing out of it is from a package of “deadfall” by Woodland Scenics (the model RR company). Floor is a printie.
I plan to put LED lights in the fireplace to make it glow. Working on that now.
Windows in, ready for the roof.
Inside, I messed up the floor a little and did wrecked curtains.
For this project, I learned to make my own shingle strips. Black card stock, cut into 3/8″ trips, then you make 1/4″ cuts every 1/4″ in the strip. (make any sense?) Anyway, you end up with strips of shingles ready to glue.
After gluing to fit, I lifted the bottoms of shingles, then painted with a wash of black, then gray, and dry-brushed with white. A few touches of brown and dark green help with aging.
I’m ready now for the landscaping. I bought this base at Michaels, painting and aging with black and a couple shades of purple (used the same shade of purple on the curtains–Folk Art French Lilac).
I’ll post more once I do the landscaping (which will be spooky), with doors, shutters, and more lights inside. I’m going to try a few things.
I was so excited that the Chicago Show (https://www.bishopshow.com/blank-chv5) was held at the end of April this year! I’d signed up for a class with June Clinkscales so long ago, and we finally got to go!
Both my husband and I took classes (he’s very interested in the electrics side of things), and I of course shopped at the show. I’ll post more about the class–a beautiful room box–once I finish it!
For now, here’s pictures of my haul:
I stuck to small things this time, no large pieces of furniture or houses. But it’s easy to go a little nuts!My big indulgence was this set (sofa and chair) by June Clinkscales. Her work is just beautiful.Box made by Tom WaldenI decided I needed some wall art! I found these pieces from several different vendors.More wall art plus a two-armed chandelier from Luminations by Mr. K.I don’t remember who made this trunk, but it’s pretty!Shells and minerals from Wendy Smale. The skull can go in my Halloween room box. The spyglass is by Nantasy Fantasy.Little coffee grinder by ladies from Holland.Love this folding chair!It really folds.They also had plenty of tools and supplies there. Got these squares from Smaller Than Life.This was another big indulgence. Beautiful inlaid box by Chris Malcomson. Interior of the box. The ceramic shoe was buy another Dutch artist. It was the only thing at his table I could afford. 🙂 The jewelry tray is by Laura Craine.Don’t these look real? By a Hungarian artisan, Orsi’s Miniatures. The cake, macarons, and Rocher chocolates were made by Betinha Murta. I took a class from her too, which I will show in another post. We made a shabby-chic chandelier that looks like a teapot and cups.Betinha Murta also made this teeny house, the one from Up! 🙂 I loved that movie. I loved this adorable little girl by Pat Melvin. I have another of hers. I don’t usually buy dolls, but hers I like. Chair is another piece by Laura Crain. I was really pleased to find a table selling these metalwork pieces by Pierre Luigi, from Italy. He wasn’t there, but they were selling his stuff. I have some of his 1/4″ scale things, and I hadn’t realized he was still making things in 1″ scale. I bought a number of little pieces, this baker’s rack, trivets, eyeglasses, and a few others. Some shabby chic wooden pieces from a German vendor, Puppenstuebchen.Another indulgence, a lovely pot by Van T Potter.I love turned wood. These are by Standing People Design. We ended up sitting next to them at breakfast at a diner across the street, so I went to their table that morning and found these lovely turned pots.I can’t remember who made this little tiger. But I loved it! I have written books about tigers (ok, shapeshifter tigers), so it called to me!The scale is by Puppenstuebchen, topped with a silver oil and vinegar set by Pete Aquisto.I did not buy this finished piece, but I bought the kit. It’s by Jill Castoral. I did her wine cellar in a wine box a couple years ago.This alarm clock is amazing. It’s by Ulus Miniatures, an artisan from Mexico. He does very cool metal minis, miniature tools and things that are super realistic. (The dust on the top is my own addition.) I discovered when I got it home that one of the legs had fallen off in transit, and I could’t find it. I put a wire in as filler, which is why it looks funky. When I can find a better substitute leg I’ll make a repair.
I had such a blast. I almost didn’t go because I was so busy and travel is such a pain right now, but I took the chance, and I am so glad! It was wonderful. Weather in Chicago was very cool and windy, but that is Chicago in spring. We found some good restaurants to go to when we were tired of expensive, bland hotel food, met people, and just had great fun.
Me with the gorgeous June Clinkscales! (I’m such a fan girl.) I love her steampunk look.
Next I’ll post pics of things I *didn’t* buy, and talk about my classes once I finish the projects.
I recently took a cruise to SF with a stop at Catalina Island (near Los Angeles). I didn’t get to see the painted ladies of SF, sadly, but Catalina had some interesting architecture. Plus a mini find aboard the ship!
First, the minis. I was on a Holland America ship and in their “Grand Dutch Cafe” (coffee and pastries, yum), they have these little porcelain windmills. They’re displayed inside a table, with mirrors so you can see all sides. I was sipping tea, looked down into my table, and cried, “Minis!!” (Well, I yelled it to myself.)
You can see my tea mug above on the table–the windmills are about that size.
Now, on to buildings:
In San Francisco, we took a bay cruise from the Golden Gate to the Oakland Bay Bridge. We passed close around Alcatraz. It’s derelict, but maybe some inspiration for weathered minis.
Iconic San Francisco (click photos for larger versions). The last photo is a seal statue done with succulent plants on the waterfront.
On to Catalina! I had never been to Santa Catalina before. The little town (which is about two square miles) is called Avalon. It’s an interesting, and quiet little beach town–tourists stay in the marina, and the back streets were almost silent and traffic free. People tool around the town in golf carts (gas-driven ones).
The round building is the Casino–but not a gambling one. They’re using the word “Casino” in the sense of “Gathering Place.” The Art Nouveau entrance (first row of pics) is under the arched portico. They do a film festival and other events there.
As you can see, the architecture goes from cute beach style houses to mansions up the hill. I will have to go back and explore this island!
Between this post and the last one I finished the Mountain Retreat (mostly), then got caught in a lot of work, and then went on a cruise! (The last one was the most fun).
My least favorite task in dollhouse building is the roof and shingles, but this kit makes it fairly simple.
The roof goes on in several pieces. All are scored to show where the shingles should be laid.
Shingles come in long strips, already staggered for a realistic look. They’re cedar shakes, no need for staining.
The shingling starts on the long piece of the front roof, in the valleys between the gables.
Next, I shingled all the gables.
The kit includes narrow strips of shingles to finish off the top edges.
Back roof shingling done.
Shingling done.
Now for the outside and inside finishing details.
Stairs in place. There were two stair support “legs” in the kit, but these broke off. I realized that once the staircase was glued in place, I had no need for them.
The interior railings (including stair railing), stained and ready to be installed.
The floor has holes where the railings are to be inserted. The stairs do not–I glued the railing directly to the steps.
The indoor railings in place.
Once the shingles were done, I glued on the chimney, which fits in a niche in the roof. The porch and balcony railings are painted and ready to be installed.
As with the indoor railings, handy notches in the floor help install the porch and balcony railings. The instructions say to paint the balcony and porch floor white, but I liked it stained, so kept it that way.
Final finishing is to install the kitchen cabinets and finish the cornice and baseboards here. I first put in the upper cabinets against the ceiling as instructed, but realized the ceiling was too high for that to be realistic. A scale-sized person would never be able to reach them! I took them out and lowered the cabinets to a more realistic spacing.
Upstairs the cornices fit against the gabled ceiling.
Adding the gingerbread finishes the outside.
The finished inside.
I have chosen to stop here. The kit includes a base and landscaping, but I probably won’t do that until I take the house back to my mountain house, where it will stay.
I’m not yet sure what I’ll do with the interior. It could be a regular house, or I might make it a ski lodge with snuggy places to sit and a restaurant / bar, with guest rooms upstairs. Not sure yet. When I return to the mountains I’ll visit a ski lodge and make notes. It would also make a cozy B&B.
So that’s it!
I enjoyed this kit. It’s fairly easy to put together–the real work is simply painting and prepping all the many pieces of windows, doors, railings, stairs, etc.
This kit is called Elena’s Mountain House by Hart’s Desire Miniatures. She has a shop on Etsy, plus her kits are sold through Hobby Builder’s Supply: