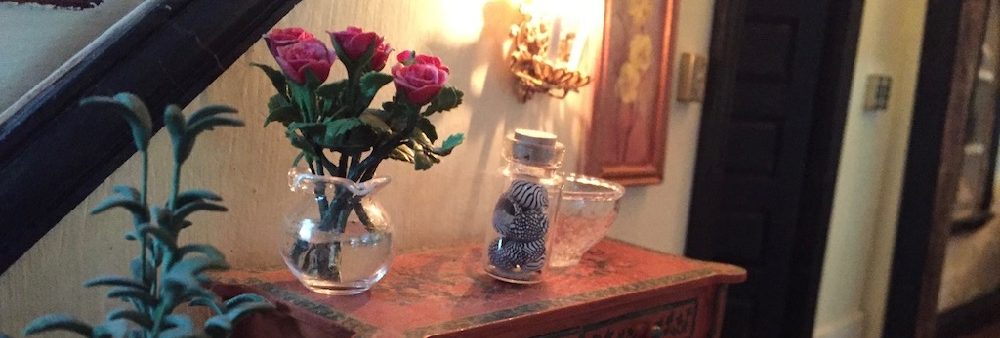
I put furniture into and out of this house forever, because I couldn’t decide how to decorate it. Finally I did a deep dive into my boxes of 1/4″ scale “junk” and pulled together kits and furniture I’d previously purchased (like the pretty wicker bed). I also added bits leftover from other kits and my fabric stash. Scroll for more photos.
I purchased the beautiful sofa, chair, and side table from Samantha Creations (her Etsy shop), especially for this house. I thought the colors went well with the theme (and they’re so well made). She has a lot of nice stuff. Tiny lamp is made by me from my large bead stash.
Cozy window seat for reading in the sunshine. (I couldn’t get good photos of this house, try as I might).
I made the lamp on this night table as well. The adorable dressed wicker bed I bought at a Chicago show (I can’t remember from who now).
I decided this house belongs to an older couple who enjoy relaxing, cooking, and puttering in the garden. One of them loves to knit, hence the box of yarn near the chair upstairs.
I finished up my Halloween House for this year! This quarter-inch project started as a bare-bones kit from Jill Castoral. She adds suggestions for finishing, some of which I did and some of which I went my own way on. Learned a lot about aging and creating siding and shingles from card stock. (See previous post for more about that, and scroll down for more about the landscaping.)
I added LEDs to the inside for some spooky lighting. Two in the fireplace and one in the fat candle by the books. Wires go out the back to a battery.
For the landscape: I used a round wooden base from Michaels, and then built up the hill from layers of styrofoam, which I painted black. I added soil and green clumpy stuff from Woodland Scenics. I also got the tree form from them (it’s a flat plastic thing but I painted and bent it into the shape I wanted.)
I really enjoy Halloween scenes. They’re so much fun.
I bought this 1/4″ scale kit from Jill Castoral at the Chicago show. She has a line of kits where you buy the shell (three walls, roof, floor, windows and door, fireplace and chimney), and then you kit bash it into whatever you want. She has instructions for turning the kit into anything (Halloween, Christmas, Spring, Elf, antique store), and you can go crazy on your own.
I like these because while I have the main pieces cut out for me, then I can do anything, using scraps I have lying around.
I am in my summer house, and my scrap stash is in my winter house, so I had to seriously improvise, but it made me more creative.
This is the basic structure put together, the chimney painted dark gray and aged with light gray, black, and dark green paint.
Siding is cut from card stock. Looks terrible here.
Painted the siding gray.
Also painted the interior dark gray.
The siding aged with washes of light grays.
One thing I did on the siding–I wasn’t satisfied with the way the paint blended the boards together, so I took a pencil (a thin-lead mechanical pencil, which I keep on my work table to make notes and mark stuff), and shaded the edges of each board, smearing with my finger as I went along. I like how it turned out.
The interior aged. The fireplace is included–I sanded it and dented it a little.
Fireplace finished and painted. The branch growing out of it is from a package of “deadfall” by Woodland Scenics (the model RR company). Floor is a printie.
I plan to put LED lights in the fireplace to make it glow. Working on that now.
Windows in, ready for the roof.
Inside, I messed up the floor a little and did wrecked curtains.
For this project, I learned to make my own shingle strips. Black card stock, cut into 3/8″ trips, then you make 1/4″ cuts every 1/4″ in the strip. (make any sense?) Anyway, you end up with strips of shingles ready to glue.
After gluing to fit, I lifted the bottoms of shingles, then painted with a wash of black, then gray, and dry-brushed with white. A few touches of brown and dark green help with aging.
I’m ready now for the landscaping. I bought this base at Michaels, painting and aging with black and a couple shades of purple (used the same shade of purple on the curtains–Folk Art French Lilac).
I’ll post more once I do the landscaping (which will be spooky), with doors, shutters, and more lights inside. I’m going to try a few things.
Between this post and the last one I finished the Mountain Retreat (mostly), then got caught in a lot of work, and then went on a cruise! (The last one was the most fun).
My least favorite task in dollhouse building is the roof and shingles, but this kit makes it fairly simple.
The roof goes on in several pieces. All are scored to show where the shingles should be laid.
Shingles come in long strips, already staggered for a realistic look. They’re cedar shakes, no need for staining.
The shingling starts on the long piece of the front roof, in the valleys between the gables.
Next, I shingled all the gables.
The kit includes narrow strips of shingles to finish off the top edges.
Back roof shingling done.
Shingling done.
Now for the outside and inside finishing details.
Stairs in place. There were two stair support “legs” in the kit, but these broke off. I realized that once the staircase was glued in place, I had no need for them.
The interior railings (including stair railing), stained and ready to be installed.
The floor has holes where the railings are to be inserted. The stairs do not–I glued the railing directly to the steps.
The indoor railings in place.
Once the shingles were done, I glued on the chimney, which fits in a niche in the roof. The porch and balcony railings are painted and ready to be installed.
As with the indoor railings, handy notches in the floor help install the porch and balcony railings. The instructions say to paint the balcony and porch floor white, but I liked it stained, so kept it that way.
Final finishing is to install the kitchen cabinets and finish the cornice and baseboards here. I first put in the upper cabinets against the ceiling as instructed, but realized the ceiling was too high for that to be realistic. A scale-sized person would never be able to reach them! I took them out and lowered the cabinets to a more realistic spacing.
Upstairs the cornices fit against the gabled ceiling.
Adding the gingerbread finishes the outside.
The finished inside.
I have chosen to stop here. The kit includes a base and landscaping, but I probably won’t do that until I take the house back to my mountain house, where it will stay.
I’m not yet sure what I’ll do with the interior. It could be a regular house, or I might make it a ski lodge with snuggy places to sit and a restaurant / bar, with guest rooms upstairs. Not sure yet. When I return to the mountains I’ll visit a ski lodge and make notes. It would also make a cozy B&B.
So that’s it!
I enjoyed this kit. It’s fairly easy to put together–the real work is simply painting and prepping all the many pieces of windows, doors, railings, stairs, etc.
This kit is called Elena’s Mountain House by Hart’s Desire Miniatures. She has a shop on Etsy, plus her kits are sold through Hobby Builder’s Supply:
The second floor slid into slots in the walls, Interior walls glued in place.
The second floor slides through the doors on the second floor to create small balconies. Holes will receive the railings later.
The second-floor rooms wallpapered.
Upstairs front window in place. One reason I liked the look of this house is the picture windows on the second floor. The mini people can look out at their beautiful view.
Doors to the balconies are also done.
Side windows (same on both sides). These were tricky–each has three interior and three exterior sashes and three window panes. The overlaying frames, fortunately, were all one piece.
Baseboards in place in the three rooms.
The rooms also have corner moldings between wallpaper and wood wall.
Next–back to the first floor to add ceiling cornices. Then on goes the roof!
Once I had the stonework (scribed wood sheets) on the walls I was ready to glue the walls together. Handy slots in the first floor position the exterior walls, starting with the front.
I continued adding walls all the way around until the house’s shell was put together.
The interior walls in place, plus I have stained the plank walls. The kitchen cabinets set in to make sure the interior wall is positioned correctly.
Next I added the foundation.
Now for the fun. Painting the stonework!
I did not have access to all the recommended paints and wax for the stonework (supply chain issue rears its ugly head). I used Deco Art clear Creme Wax as an undercoat and then spice brown and light ivory craft paints.
Basically, you paint everything with a coat of ivory, then when that’s dry add a coat of cream wax and let dry. Then a thin coat of brown, which you wipe off (highlights the mortar lines). Then you dry-brush dab dab dab on ivory and brown with a sponge brush. I went back and forth between colors until I liked it. I thought at one point to add some light gray, but it looked muddy so I went back to white and brown.
This photo shows how the stonework turned out. Then I masked it with masking tape and painted the siding Evergreen.
After that it was time for wallpaper and windows.
This kit comes with plenty of wallpaper, so if you don’t want the board walls, there’s enough to cover the whole room. You can always use your own wallpaper for a different look. The short sheets of wallpaper in the kit are for the first floor and the larger sheets for the second floor.
The first floor windows and door that I had painted and stained before I left my real-sized mountain house.
Each window has two casings that fit into the window openings, with thin plexiglass between them (the blue squares are the top left are the plexiglass with protective plastic). Then a frame for the outside and a frame for the interior wall.
The large downstairs window finished and framed. (I will be touching up paint later!)
Small downstairs window. This is the kitchen window from the outside.
Downstairs room finished with interior window frame and baseboards.
Kitchen with window frame. No baseboards here because the cabinets will cover the walls.
Entrance with fireplace glued in, baseboards and front door installed.
First steps are to pre-assemble the stairs and the kitchen cabinets. The stairs are rustic and open, so easy to fit the steps to the stringers. I stained the staircase before glueing it.
A square is best to assemble the cabinet shell. I wanted to paint my cabinets, so I did not stain the before assembling.
The shell of the bottom cabinets assembled with the drawers and doors matched to each one.
The lower and upper cabinets roughed together and painted.
I wanted a granite-looking counter so I painted the countertops gray and then spattered ivory, black, darker gray, and metallic silver over them using a toothbrush (my thumb got very messy). I like how they turned out. Bigger blobs I carefully painted over but a few I left.
The kitchen cabinets and appliances ready and waiting for knobs and to be installed in the house. You can see where I did my spattering!
Next, the walls.
The kit’s instructions have you gluing the walls to the first floor (the stained piece in the picture) and then using contact cement to put on the stonework and siding. I don’t like contact cement (toxic, stinky, and if you don’t get it right the first time there’s no give), so I used wood glue.
That meant I had to apply the stonework and siding, plus the wood plank interior walls before I put the house together. The siding etc is very thin, so will warp. I used many clamps and weights to make sure there was no warpage, and it turned out fine.
I haven’t done munch mini-ing since moving back to the desert because a) I went to two conferences back to back, b) hit the holidays, c) had to move the rest of the stuff out of another house to put it up for sale.
However, I did some small projects and some Christmas minis! Plus I’ll share my minis from past Christmases.
First, this un-Christmasy suitcase, mixed 1/4″ and 1″ scales. Safari time (old-time safari, that is.)
Then I did a Christmas scene kit:
Quarter-inch scale vignette–this is only about an inch deep, if that.
More mini Christmas scenes!
This scene I put together from a bunch of Christmas items I’d collected over the years, some given to me, some purchased, some found. I arranged it all in a clear acrylic cube, and it stays on display all year. I love this one.
Then we have this micro scale Christmas house, paired with a little lighted tree my husband bought at a show (the lights blink).
I have not yet furnished the interior, but maybe next year! (Click photo to see larger versions)
Finally the peddler wagon! I love this. It’s 1″ scale. I used one of my old Breyer horses to pull the wagon, making him a nice blanket and garland. I’ve had this horse since I was ten years old!
I will return to working on the Mountain Retreat house at the beginning of the new year. It has been a busy fall! It will be a busy spring too, but hopefully with more time for minis!
Credit where it’s due: Most of these are kits from Robin Betterley, except the mini Christmas tree and gifts scene (which is stuff I acquired all over the place), and the gingerbread house on the front seat of the wagon–that one is a kit by True2Scale. Also the blinky Christmas tree came from a show–not sure who made it, or if it’s commercially available.
I tried to do a video of the unboxing of Elania’s Vacation House kit, but it was a dismal failure, so here are photos instead.
There is a ton of stuff in this box. The walls, base, roof, and floors, plus stone and clapboard siding, plexiglass windows, logs (if you do the log version), shingles, landscaping materials, stairs, trim, windows (casings and frames), wallpaper, and the full built-in kitchen.
So many little pieces! The first step was to clean off the laser burn with a bleach wash, something I haven’t done before. I usually sand or wipe of the burn, but I have to say the bleach did the job. A little in a jar, swish the pieces around, and then weight them while they dry.
I am now staining and painting all the stairs, doors, windows, floors, ceilings, etc. Once I have all that done, I can begin the actual building.
I’ll be doing the “Aspen retreat” (I’m calling it the Mountain Retreat), which is the one with stone facing and green siding. Don’t know if I’ll do the snow or just landscaping. Summer or winter–I haven’t decided!
I’ve been living about a month and a half in our mountain retreat, and after gathering supplies, was able to do a couple of small projects (micro scale).
I had to start from scratch, so I bought the table, lamp and supplies, and my husband put together the little shelf unit for me as a surprise. I put together the table myself, but it was pretty easy. Very simple and sturdy, perfect for this space.
First project I did was this mini suitcase with a scene inside. Part of the Betterleys “Secret Suitcase” kit club. Real traveling is difficult, but imaginary traveling can be fun, right?
This on is “At the Opera” and has mixed quarter inch and one inch scales.
There is one suitcase for each month. I am way behind–I’ve only put together two. I signed up for this club late last year–I don’t think they are selling these on the website.
Next project was this one–a microscale shop called Lavender Lane (another Betterley kit). The structure only took me a few days to put together (it would probably take most people a day, but I can only snatch time here and there). I have the kit for the interior, which looks adorable, and I looking forward to finishing the whole thing.
The ground floor will be a shop and the second floor a bedroom.
I’m particularly fond of Lavender Lane because in 2019, when I was in Rome, I got an email saying that this kit was on pre-order (the latest of the Watercolors shops). I love the shops to much that I jumped on the pre-order. Now, I was in ROME! A beautiful, beautiful exciting city, and my priority at that moment was ordering this kit! This is my devotion to miniatures. (I did enjoy Rome too and dream of the day I can go back.)
I have another month and a half to go in our retreat from the heat, and I’ve decided do something bigger than more tiny kits. I had some stocked a few full house kits, but of course I left them at our other abode.
In an issue of American Miniaturist, I saw an ad for Hart’s Desire Miniatures on Etsy, so I went to her site and purchased a 1/4″ scale house kit. The kit arrived two days after I ordered it!
This is the one I chose–you have options to make either a stone house, or a log cabin style house or a mix. The kit includes everything, even the kitchen.
In my next post I’ll show you what’s in the kit and my thoughts on getting started. I will be doing the stone mountain retreat to celebrate my own mountain retreat (though we are living in a small wood-sided townhouse, not a lovely villa like this one!)