Honeysuckle Cottage Updates

I finally got around to finishing the interior of the Honeysuckle cottage, which I built some years ago now.

I’ve updated its page (https://jennsminis.wordpress.com/quarter-inch-houses/honeysuckle/) but here are some photos below.

I put furniture into and out of this house forever, because I couldn’t decide how to decorate it. Finally I did a deep dive into my boxes of 1/4″ scale “junk” and pulled together kits and furniture I’d previously purchased (like the pretty wicker bed). I also added bits leftover from other kits and my fabric stash. Scroll for more photos.

I purchased the beautiful sofa, chair, and side table from Samantha Creations (her Etsy shop), especially for this house. I thought the colors went well with the theme (and they’re so well made). She has a lot of nice stuff. Tiny lamp is made by me from my large bead stash.

Cozy window seat for reading in the sunshine. (I couldn’t get good photos of this house, try as I might).

I made the lamp on this night table as well. The adorable dressed wicker bed I bought at a Chicago show (I can’t remember from who now).

I decided this house belongs to an older couple who enjoy relaxing, cooking, and puttering in the garden. One of them loves to knit, hence the box of yarn near the chair upstairs.

Very glad to have this house complete!

Halloween Kits

I just got this email from Robin Betterley–if you like starting your Halloween scenes now, here are some kits (most 1/4″ scale, some 1″ scale):

BEWARE… H.a.l.l.o.w.e.e.n. is CREEPING up on Us! Grab some spooky kits now and be ready for a ghoulish fun time.

1/4″ (1:48) scale Kit Olde Crowe Apothecary
backwall copy_small.jpg

1/4″ (1:48) scale Kit Open Book – Ricky Raccoon and the Very Scary Crows1/4″ (1:48) scale
Exterior Scene.jpeg

3D Gourds Kit 1/4″ (1:48) scale

Photo Pumpkins and Gourds.jpeg

3D Apples Kit1/4″ (1:48) scale

Photo Apples.jpeg

Haunted Houses Kit 1/4″ (1:48) scale

Photo Haunted Houses.jpeg

3D Skulls Kit1/4″ (1:48) scale

Photo Skulls.jpeg

Apothecary Bottles Kit1/4″ (1:48) scale

Photo Apothecary Bottles.jpeg

Spooky Books Kit1/4″ (1:48) scale

Photo Spooky Books.jpeg

A Little Scary Kit 1/4″ (1:48) scale

front.jpg

Petite ShopThe Black Hat Society Kit1″ (1:12) scale

Photo.jpg

Creepy Canisters Kit 1″ (1:12) scale

photo-10.jpeg

Scary Mugs Kit1″ (1:12) scale

photo6.jpeg

3D Jack O’ Lantern Kit1″ (1:12) scale

photo-2.jpeg
3D Skull Kit1″ (1:12) scale

photo-7.jpeg

Brew Cabinet Kit

filled.jpeg

Photo shows how we filled our cabinet – What would YOU do?
*Cabinet and Accessories Sold Separately*

Back in Stock!! 1″ (1:12) scale Dollhouse & Cabinet Kit with Microscale Rooms

6458bb548a2f226af26538e074a417e9_1024x1024.jpeg

Secret House – Ravenwood

Microscale Furniture Kit to fill up ALL of the spooky rooms inside the dollhouse!

Interior – Ravenwood

consult.jpg


Visit our Website Robin Betterley’s Miniatures 

I don’t work for them! But I thought I’d pass on links to the goodies.

Pickett Pond Interior (1/4″ scale)

I’ve put together nearly all the kits to furnish the interior of the Pickett Pond (pics of all follow). Some of these kits (though not all) are still available at Robin Betterley’s site (www.robinbetterley.com)

Kitchen

Living Room

This under-the-stairs day bed is my favorite piece. I love all the books (which were easy). I also like how all the throw pillows on this and the sofa are regular bed pillows, so people can sleep anywhere they can. Important in a vacation cabin.

Bathroom

The downstairs bathroom is partly outside.

Sink, toilet and shower are inside.

Tub and towel rack out on the porch. No running water out here! Tub is hand filled.

Upstairs bedroom / loft

Hanging bed and nightstands.

A dresser with another day bed fits under the eaves.

A bench full of games and books for rainy days.

The Porch and Pond

A big picnic table for family meals outdoors.

This rowboat kit is very realistic–I put together the ribs, keel, bottom boards, seats, gunwale, oar locks, and rope, and sanded the oars to give them shape.

So that’s the Pickett Pond. I really like this house–the colors and the warm, rustic feel. I only got to do the cabin thing twice when I was a kid, but I remember the informality and how indoors and outdoors kind of blended. I’d love to vacation at the Pickett Pond! (but with more running water and electricity…).


Revisiting older 1/4 inch project: Nob Hill

I went back to this 1/4″ scale house and finished the last two rooms I needed to furnish.

This house is called the Nob Hill, a kit from Suzanne and Andrew (who retired and shut down their online store last year, wah!).

I had two rooms left to furnish: The living room and the dining room.

I bought a few things specifically for this, and also went through my stash and put together some furniture and accessories.

Finished living room.

Dining room.

This gorgeous kit is by Jean Day (JDay Minis). Her Etsy shop: https://www.etsy.com/shop/jdayminis. She has beautiful kits, very reasonably priced.


I can’t remember where I got the beautiful mirror, but I picked it up at a recent dollhouse show (probably Good Sam) for $5. The chest is a kit by Really Ravin’ Minis (http://www.reallyravinminis.com)

Chairs, table, and rug are pieces of the furniture kit made for this house. I used the rest of the kit in another house (the French Quarter). The chairs and table are 3D printed, and I painted. I had leftover pillow fabric from the daybed, which lends a nice contrast.

Overview.

Overview plus a peek at the dining room.

This is another kit from JDay Minis. I love it! This is a hutch kit plus two accessories kits (1. plates and things, 2 Wooden cutting boards etc.) The dishes are white, and I added decals. (JDay also sells plate kits in different colors).

The hutch in place in the dining room. I have the wooden spoons in their holder in this pic.


The table and chairs are from Robin Betterley’s miniatures. They’re called “A la Carte” pieces and are sold separately, which is nice. I like mixing and matching, and each piece is reasonably priced.

On the table are little roosters that came with the wooden accessories kit for the hutch.

I might add a few more accessories and maybe a table to fit under the dining room window, but essentially this house is done.

The rooms below I’d finished previously:

Kitchen.

Lots of cookbooks.

Entrance hall and stairs.

Glad I did this house. It looks nice sitting on the mantel in my living room, and now all rooms are furnished!

Three More Small Projects

As I said in my last post, I sometimes like to make small, quickly built scenes (kits) for that sense of accomplishment. Here are three I’ve done in the past couple of weeks:

Microscale (1/144) Book “house”. There’s no inside, just a cute facade. This can stand alone or be a decoration in a 1-inch scale house. (Kit by Robin Betterley):

Pocket watch scene (kit by Ginger Landen Siegel). I picked this up at a show. It’s micro-scale, the pocket watch blank is the size of, well, a pocket watch. The scene is paper made 3D. Four pictures get stacked with various bits cut out and wood, lace, landscape material, etc added for texture. Ginger specializes in these kinds of scenes, which are a French art form from the 19th century. I did one of Ginger’s illusion kits in a larger scale here.

Yesterday, I finished this one:

This is the “Pie Pickup,” a 1/4-scale kit from True2Scale.

I picked this up at the Good Sam show I went to in October. The kit contains *everything*–pickup, the art, dishes and placemats, pies, chairs, shelves, jars, crates, fruit, and various accessories. I added the grass.

Fun little kit. Much is 3D printed, so there was a lot of painting with tiny brushes.

I like little kits like this–they’re low-stress, and don’t take up much space when I’m done.

I’m looking through my stash for my next small project, and trying to decide where I’m going to put the Westville when it’s finished.

Cool Stuff from the Chicago Show

And now for the gorgeous things!

From Aristocratic Attic

June Clinkscales. Her work is breathtaking.

Back of the chair from June C.

Laura Crain. Fits well in the shabby chic half of my Beacon Hill.

Ulus Miniatures www.ulusminiaturas.com Just amazing things! So detailed and perfect.

A tea caddy from Geoff Wonnacott. He’s talented, and and a nice guy too.

Scroll Chest from Eamon O’Rourke.

From the O’Rourkes again–a Medieval potty. The moss is the TP.

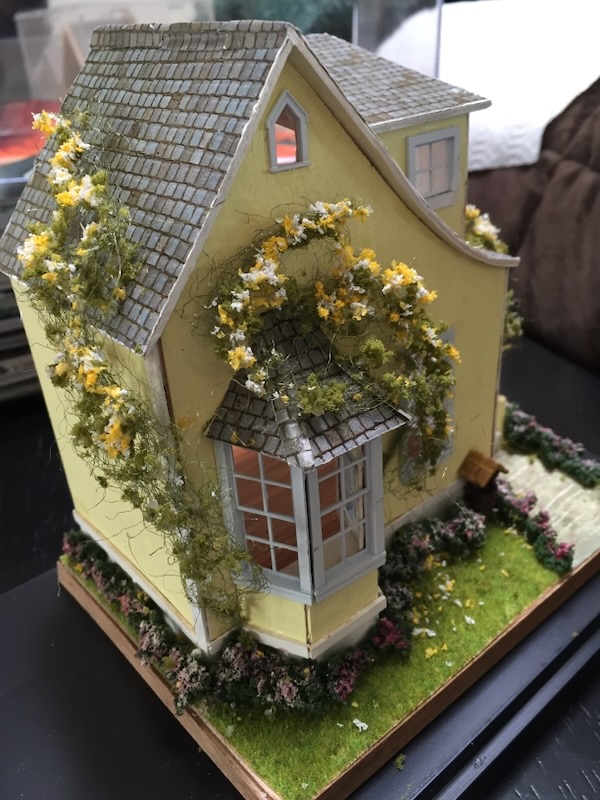
I had just told my husband I was going to cool it on buying kits, but he waves at this table and says, “Have you seen this?” So I purchased this kit for the wine box vignette and the little house below. It’s all his fault. (Jill Castoral)

Gorgeous half-inch scale vignette by Japanese artist, Fumiko.

I put this cat by Sue Veeder into my Halloween room. Doing what cats do!

Fan girl moment! Me and the incomparable Ferd Sobol. I bought his book and also the caned chair in my hand. The Sobols and their daughter are so nice.

Quarter inch scale sofa and chair by Debbie Young.

There wasn’t much quarter-inch scale there, but what I saw I glommed. These are by Debbie Young (Young at Heart) and True2Scale minis.

Lovely quarter-inch furniture from a British artisan–Seaside Miniatures.

I’ve loved Wendy Smale’s things since I started buying her pillows years ago. She does a lot of minerals, shells, fossils, and scientific collections now.

More kits from a German vendor–these looked fun.

The plaques are from Teapots and More Minis; the suitcase pile, chocolates, tray, and macaroons are by Betinha Murta, and the espresso machine from Mini Fanaberia, a Polish artisan who makes appliances that are so detailed (refrigerator lights come on and everything). www.minifanaberia.com

Cute little girl from Pat Melvin.

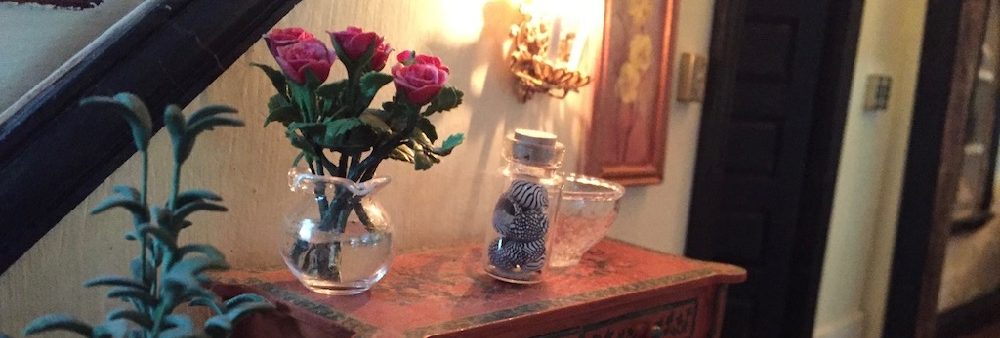
By Fern Vasi. I actually bought this one in March at the Small World show, but she was also at the Chicago show. She calls it “Parrot Head.”

I also found a lot of fabric and trim from Miniature Luxuries and accessories from Cottage of Miniatures who had a huge spread of hundreds of tiny things (like garden hoses and tools, boxed and jarred foods, desk accessories, bathroom accessories, and much more).

This is only a sampling of what was there. Every time I went into the ballrooms (3 of them), I’d find something new. The show runs Friday through Sunday (closes Sunday at 4), and still you wouldn’t see everything.

As I said in my last post, totally worth it to buy the Friday preview ticket. Go through the show catalog beforehand to find the artisans that are a must-see for you, and visit them first. Then take a step back and browse. Take breaks in the main hall or lobby to breathe and keep calm.

Next post–Workshops.

More Nob Hill and Mini Framed Art tutorial

Before I could put the roof on the Quarter-inch scale Nob Hill and hook up the electricity, I had to furnish the entire second floor.

I needed to finished the bathroom, bedroom, and room in the front–so here’s what I did.

Bedroom before I put the roof on.

Finished with roof and lights. You can see the front room, which I decided to keep simple, like an extension of the bedroom.

The bathroom is a kit created for this house by Suzanne and Andrew’s Minis. I added the towels, bottles, decals, and plants from my own stash and leftovers from other kits.

A peek at the bathroom through the window.

For the pictures: I search the net for vintage pictures or classic paintings and then size them for the house I need. I measure real pictures and posters and calculate the dimensions (easy for 1″ scale). These are quarter inch scale, and about 1″ x 3/4″ and 1″ x 1/2″.

I line these images up in a Word doc file (inserting each image and making columns), and then print on card stock using my color printer (when it has ink, which it usually doesn’t). I do many of these at a time and keep them in a folder. As you can see, I have more than one copy of the same picture, so if I mess it up, I have a second one handy.

For the frame, I cut pieces of molding that I’ve stained or painted. In this case, since it’s so small and informal, I cut straight pieces of 1/16 inch wood strips, stained them, and then glued them around the picture. For bigger pictures, I will use picture-frame molding and miter the corners or, even easier, buy a frame and size the picture to fit before I print it.

I glue the frames right to the cardstock and then cut it out with an X-acto knife.

This makes for quick and easy art to stick on the walls.

So now the Nob Hill has a roof and lights! Next, I need to furnish the downstairs.

Minis last month

I haven’t posted a lot since Christmas, but I’ve been making minis. Mostly kits, as they are soothing after a hard day’s (week’s, month’s) work. As usual, click photos for larger pics.

What I’ve mostly been doing is decorating the interior of the Petalstone (1/4 inch scale), which is this house:


I’ve put together kits for the hall benches at both entrances:

Plus the dining room table and chairs:

In the attic is the writing nook. I am in awe of anyone who can design a 1/4″ scale computer and printer. I never would have thought of that!

The kit makes about 162 individual books. In 1/4″ scale. (Wow.) I have made about 90 of them. I’ll make the others when I can, and use them in other projects.

This is the conservatory kit: Potting benches, plants, plants, plants, pots, crates, etc.

We even have some gardening boots!

I had only planned to do the kits for the conservatory and writing nook (because I loved all the accessories), and then decided, what the heck. I’ll just do the kits for all the rooms.

This is a Robin Betterley house and room kits (Link in my sidebar under quarter inch scale).

I am, though, getting the hankering to do another Greenleaf kit that’s sitting in a box in my closet (the Westville; so much smaller than the Beacon Hill!). I’ll see.

Sanity project: Interior of Ravenwood 1/144 house

Because I was working so hard, I took a break from the Beacon Hill to finish the interior of the Ravenwood house, which I’d built a couple of years ago. (Post on exterior here: https://jennsminis.wordpress.com/2016/10/28/halloween-interlude/)

The house is microscale, sitting on a one-inch scale cabinet.

This house kit is by Robin Betterley. http://www.robinbetterley.com It’s called a “secret house,” meaning it is solid when you look at it, but secret compartments slide in and out, showing you the interior.

One thing I like about Robin’s miniatures is that she tells a story for many of them. The story of this house is about a young woman named Sophronia whose family moves into this derelict house and makes it a home. She’s terrific at natural medicine and helps out many from the nearby town. She also nurses any ravens she finds hurt in the woods around their house. The entire story is included with the kit, including the day the lonely doctor meets Sophronia in the woods …

I mention the story to give context to the rooms. This is the left side of the house. Ground floor, living room. Second floor, dining. Third floor, father’s bedroom.

The tower–the middle of the house.

First floor, entrance. Second floor, hall with entrance to the ravenry (through the large picture). Third floor, library.

Right side of the house.

First floor, Sophronia’s consulting room. Second floor, ravenry, with cage. Third floor, Sophronia’s bedroom. The pouf in front of the dressing table is a tuffet. (Now you know.)

The house in its entirety.

The lower half is a one-inch scale cabinet for potions and spooky books. (The bottles and book below are mine–not in the kit.)

I loved this kit. For the interior, everything comes with it–all the furniture, books, raven cage, chandeliers, candelabras, paintings, fabric, carpets–everything!

Just what I needed to ease my stress. However, microscale is tiny! I need to get back to one-inch scale, which looks huge to me now.

Next, I return to the Beacon Hill and start finishing up the left side of the house.


Beacon Hill: Chimney

I have the walls papered (will be trimmed with molding), and the ceiling started, but I decided to wait on the chandeliers until I have more of the structure built so I don’t damage anything.

Going back to the building instructions, the next step on the outside is the chimney.

Pieces from left to right: chimney sides, chimney top (small piece at top), third floor hearth (small piece at bottom), and the chimney outside trim.

The third-floor hearth gets inserted into the fireplace hole. You have to turn the piece sideways and wriggled it in there. The tab in the back goes through the outside wall.

Sides go on the sides–the side with one tab faces the house, the two tabbed side faces the outside of the house. I constantly got these turned around.

The top fits onto the sides.

The trim goes on like this.

Before gluing, I lined the hearth and chimney with brick paper so it looks more realistic.

The hearth with the chimney sides now glued in place.

Chimney sides and top in place. I left the top unglued (just pushed it into the slots) in case I need to change or fix something later.

I am not putting the chimney trim on yet until I decide what colors to paint the house and trim. Plus I might want to brick the outside of the chimney.

I have to run off to a conference, but when I return, I’m going to the hardware store to get latex paint for the outside so I can get started finishing the outside and settling it on top of the garage. I will probably also put a light on one of the third floor windowsills as I did to the other half of the house before putting on the roof.

It’s coming along!